the official online retailer for Woodford, Watco, Mapa & Permacast products

Woodford Faucet Repair

Filter Your Results

Product Type

Price ($)

-
2
69
137
204
271
Sort By:
Page:
RK-101VB Model 101 Vacuum Breaker Float Kit.

Woodford

Item #: RK-101VB

RK-101VB Model 101 Vacuum Breaker Float Kit.

Model RK 101 VB Vacuum Breaker Float Kit.

$2.25View Details
RK-122VB Model 122 Vacuum Breaker Float Kit

Woodford

Item #: RK-122VB

RK-122VB Model 122 Vacuum Breaker Float Kit

Woodford Model RK 122 VB Vacuum Breaker Float Kit

$2.70View Details
RK-17VB Model 17 Vacuum Breaker Float Kit

Woodford

Item #: RK-17VB

RK-17VB Model 17 Vacuum Breaker Float Kit

Model 17 Vacuum Breaker Float Kit Upgrade to the full kit: The Woodford Model RK-17MH Repair Kit includes all parts necessary to repair the faucet.

$2.70View Details
RK-19VB Vacuum Breaker Float Kit

Woodford

Item #: RK-19VB

RK-19VB Vacuum Breaker Float Kit

Model 19 Vacuum Breaker Float Kit Model 19 has an oval handle (see image)

$2.70View Details
RK-22VB Vacuum Breaker Float Kit

Woodford

Item #: RK-22VB

RK-22VB Vacuum Breaker Float Kit

Model 22 and V22 Vacuum Breaker Float Kit

$2.75View Details
RK-OSF Over Sized Flange

Woodford

Item #: RK-OSF

RK-OSF Over Sized Flange

Hole in the wall? 
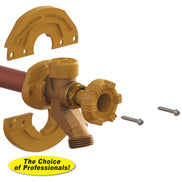
Whether updating an old faucet with a new Woodford freezeless faucet or improving an existing installation, the new RK-OSF Over Sized Flange can cover a larger hole due to previous installation plus secure the faucet to a solid surface. The RK-OSF can be attached to any new or existing Woodford Model 14, 16, 17, 19 & 101 wall flange. Outer holes are spaced a full 3 1/2" apart for better mounting screw contact in masonry or siding. For New Installations: 1. Join the (2) RK-OSF halves around the faucet tube and behind the existing faucet flange. 2. Fasten flanges together using (2) included screws. 3. Position the faucet through the wall and secure with proper type and length screws. For Repair Installations: 1. Remove any screws from the existing faucet flange. 2. Be sure the wall flange can be pulled 3/8” away from the wall. 3. Slip the Top and Bottom OSF halves behind the existing faucet flange. 4. Align the 2 inner OSF holes with the existing faucet flange holes and secure with (2) included screws. 5. Install (2) screws through the outer OSF holes to secure faucet onto wall.

$3.55View Details